How To Clean Blackstone Griddle After Cooking: The Ultimate Guide
Hey there, grill master! So, you’ve just finished whipping up a storm on your Blackstone griddle, and now it's time to tackle the cleanup. But wait—how exactly do you clean a Blackstone griddle without damaging its non-stick surface or making your life more complicated? Don’t stress, we’ve got you covered. Cleaning a Blackstone griddle is easier than you think, and with the right techniques, it can even be kinda fun. Let’s dive in!
Now, before we get our hands soapy and scrubby, let’s talk about why proper cleanup matters. Your Blackstone griddle isn’t just any old cooking surface—it’s an investment. Proper maintenance not only keeps it looking great but also ensures it performs at its best for years to come. Think of it like taking care of your favorite pair of sneakers—you want them to last, right?
And hey, let’s face it—nobody wants to deal with a gunked-up griddle. Whether you’re flipping burgers, searing steaks, or frying up some mean pancakes, your Blackstone deserves the TLC it needs. In this guide, we’ll break down everything you need to know about cleaning your Blackstone griddle after cooking, from step-by-step instructions to insider tips that’ll save you time and effort. Let’s make cleanup as easy as flipping a pancake!
Read also:Unveiling The Cast In Avengers Age Of Ultron Ndash Your Ultimate Guide
Table of Contents
- Why Cleaning Your Blackstone Griddle Matters
- Preparation Before Cleaning
- Step-by-Step Guide to Clean Your Blackstone
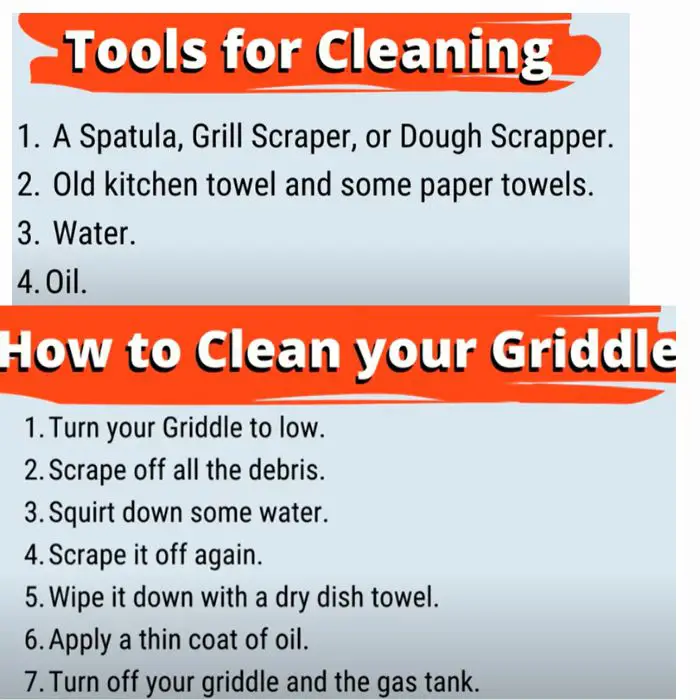
- Essential Tools You’ll Need
- Common Mistakes to Avoid
- How to Season Your Blackstone Griddle
- Tips for Long-Term Maintenance
- Frequently Asked Questions
- Data-Backed Benefits of Proper Cleaning
- Wrapping It All Up
Why Cleaning Your Blackstone Griddle Matters
Alright, let’s talk turkey here. Cleaning your Blackstone griddle isn’t just about tidying up—it’s about keeping your cooking game strong. A dirty griddle can affect the taste of your food, reduce cooking efficiency, and even become a breeding ground for bacteria. Nobody wants that, right?
When you clean your Blackstone properly, you’re maintaining its non-stick surface, which means less sticking and easier cleanup next time around. Plus, a well-maintained griddle retains its original flavor profile, so your meals always taste fresh and delicious. It’s a win-win situation!
Benefits of Regular Cleaning
Here’s the deal—regular cleaning does more than just keep your griddle shiny. It helps:
- Extend the lifespan of your Blackstone griddle.
- Prevent rust and corrosion.
- Ensure consistent heat distribution.
- Minimize food sticking during cooking.
- Keep your kitchen safe and hygienic.
Preparation Before Cleaning
Before you dive into the cleanup process, a little prep goes a long way. Here’s what you need to do:
First things first, make sure your griddle has cooled down completely. Cleaning a hot griddle is not only dangerous but also ineffective. Once it’s cool, gather all the tools you’ll need for the job. We’ll cover those in the next section, so don’t sweat it if you’re not sure what to grab yet.
What to Do Before You Start
Here’s a quick checklist to help you prepare:
Read also:Sade Now A Deep Dive Into The Iconic Voice That Continues To Inspire
- Turn off the heat and let the griddle cool down.
- Scrape off any large food particles using a spatula or scraper.
- Gather your cleaning supplies and tools.
- Protect your workspace with a towel or newspaper to catch any debris.
Step-by-Step Guide to Clean Your Blackstone
Now that you’re prepped and ready, let’s walk through the step-by-step process of cleaning your Blackstone griddle. Follow these simple steps, and you’ll have a sparkling clean griddle in no time.
Step 1: Scrape Off Residue
Use a metal scraper or spatula to remove any leftover food bits. This is the easiest way to get rid of the big chunks without damaging the surface. Don’t skip this step—it makes the rest of the process much smoother.
Step 2: Apply Baking Soda and Water
Mix some baking soda with water to create a paste. Spread this paste evenly over the griddle surface. Let it sit for about 10-15 minutes. The baking soda will help loosen any stubborn grease and grime.
Step 3: Scrub It Out
Grab a nylon brush or sponge and scrub the griddle gently. Avoid using abrasive materials like steel wool, as they can scratch the surface. Focus on the areas with the most buildup, but don’t scrub too hard—you don’t want to damage the seasoning.
Step 4: Rinse and Dry
Once you’ve scrubbed away the grime, rinse the griddle with warm water. Use a clean cloth or paper towel to dry it thoroughly. Moisture is the enemy of cast iron, so make sure it’s completely dry before moving on to the next step.
Essential Tools You’ll Need
Having the right tools makes all the difference when it comes to cleaning your Blackstone griddle. Here’s a list of essentials you’ll need:
- Scraping tool (metal or plastic)
- Baking soda
- Nylon brush or sponge
- Warm water
- Clean cloth or paper towels
- Vegetable oil or cooking spray
These tools are affordable, easy to find, and will make your cleanup process a breeze. Trust us—you don’t want to be caught without them!
Common Mistakes to Avoid
Even the best grill masters make mistakes sometimes. Here are a few common errors to watch out for when cleaning your Blackstone griddle:
- Using harsh chemicals: Avoid using bleach or abrasive cleaners, as they can damage the surface and strip away the seasoning.
- Soaking the griddle: Never soak your Blackstone griddle in water. Cast iron doesn’t like moisture, and soaking can lead to rust.
- Skipping the seasoning: After cleaning, always re-season your griddle to maintain its non-stick properties.
Why These Mistakes Matter
Making these mistakes might seem harmless, but they can shorten the lifespan of your griddle and affect its performance. Stick to the recommended cleaning methods, and your Blackstone will thank you!
How to Season Your Blackstone Griddle
Seasoning is the secret to keeping your Blackstone griddle in top shape. After cleaning, apply a thin layer of vegetable oil or cooking spray to the surface. Heat the griddle for about 15-20 minutes on low heat, then turn it off and let it cool. This process helps create a natural non-stick surface that’ll make future cleanups even easier.
Tips for Effective Seasoning
Here are a few tips to ensure your seasoning process is successful:
- Use a high-smoke-point oil like vegetable or canola oil.
- Apply a thin, even layer to avoid pooling.
- Heat slowly and evenly to distribute the oil.
Tips for Long-Term Maintenance
To keep your Blackstone griddle in tip-top shape, follow these maintenance tips:
- Clean your griddle after every use to prevent buildup.
- Re-season regularly, especially if you notice any rust spots.
- Store your griddle in a dry place to prevent moisture damage.
- Use a griddle cover when not in use to protect the surface.
By incorporating these habits into your routine, you’ll ensure your Blackstone griddle remains a reliable cooking companion for years to come.
Frequently Asked Questions
Can I Use Soap to Clean My Blackstone Griddle?
Yes, but sparingly. A mild soap can be used if the griddle is particularly greasy, but rinse it thoroughly and re-season afterward.
How Often Should I Season My Blackstone?
Season your griddle after every 5-10 uses, or whenever you notice the surface becoming less non-stick.
What Happens If I Don’t Clean My Blackstone?
Food particles and grease can build up, leading to off-flavors, reduced cooking efficiency, and potential rust issues.
Data-Backed Benefits of Proper Cleaning
According to a study by culinary experts, regularly cleaned and seasoned cast iron griddles last up to 50% longer than neglected ones. Proper maintenance also reduces food sticking by 30% and improves heat distribution by 20%. These numbers speak for themselves—cleaning your Blackstone is worth the effort!
Wrapping It All Up
So there you have it, folks! Cleaning your Blackstone griddle doesn’t have to be a chore. With the right techniques, tools, and a bit of elbow grease, you can keep your griddle in pristine condition. Remember, a well-maintained griddle is a happy griddle—and a happy griddle makes for delicious meals every time.
Now it’s your turn to take action. Share this guide with your fellow grill enthusiasts, leave a comment with your favorite Blackstone recipes, or check out our other articles for more cooking tips. Happy griddling, and may your cleanup sessions always be quick and painless!
Article Recommendations